published by MRE on Sun, 03/16/2014 - 07:47
A few years back, I started on this weather station project while at the Tokyo HackerSpace (in our FIRST location). I had grand ideas for the project, but also knew I would likely have a few failures and re-designs. In my assessment, most of the sensors would be easy. Most of the sensors are 'digita' in nature, have no mechanical parts, and I have used on their own several times. The only challenge would be integrating them all in software, and building a suitable case for everything.
published by MRE on Sat, 03/08/2014 - 00:29
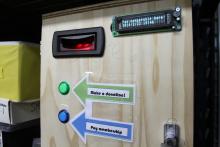
The machine has been in opperation a few weeks now and has had no real issues other than a minor code bug that was fixed quickly. It has processed a whole lot of membership payments and donations, with only one bill jam. Unfortunately, since the administrator on site did not have a key yet, they were unable to resolve the issue immediately. But, the member posted their problem on our google group and we were able to work out a solution. That is something that I think ANY cash handling machine has; when a bill or coin jams, there is not much the user can do.
published by MRE on Fri, 03/07/2014 - 22:46
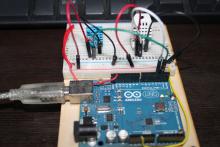
A reader of my book Arduino Projects To Save The World recently asked me about the DHT11 and DHT22 sensors. In particular, how to connect multiple sensors (and how to write the code for it) to an Arduino. I must admit I had never considered it. I have used them plenty of times, but not in parallel. Turns out, Adafruit's DHT library makes it super easy.
published by MRE on Mon, 01/27/2014 - 22:05
The first quad-copter build day was held at Tokyo HackerSpace on the 26th of January, 2014. Yves had been collecting parts for the build for some time, but was hesitant to get started. An aversion to power tools as well as realizing the absolute power the motors and blades he chose made him opt to wait till he had all the safety considerations in place before proceeding.
But finally he set a date, and invited all the members down to help/watch him start his adventure.
published by MRE on Sat, 01/11/2014 - 22:14
After performing a demonstration of the version 0.9 code and hardware to the hackerspace a few months back, I finally got around to finishing up the major features, dressing it and calling it done (for now).
I admit to some lazyness, but the winter holidays played some part in my delay.
published by MRE on Fri, 10/25/2013 - 20:06
The THS membership box will have a two button interface for the user to operate the machine. One will select a membership payment, and the other will select a 1000 yen donation. I wanted to be sure that the user knew intuitively when a particular option was available. In addition to the UI, these buttons play a role in the administration menu as well.
published by MRE on Tue, 08/27/2013 - 05:55
You may have followed my last blog post about how not to layout a pcb.
Well, I got around to finishing up the board. Fixing all my mistakes only took about an hour, and as soon as I did so, the board routing was incredibly fast. As you can see, its much more efficient and clean.
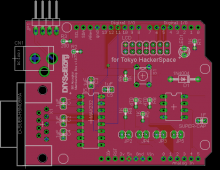
published by MRE on Sat, 08/24/2013 - 02:16
You may remember in my last post about the bill acceptor project that I had made a preliminary pin count and started assigning functions to the various Arduino pins.
The next step was to input the schematic to Eagle and start laying out the pcb. Capturing the schematic was no problem, and went rather quickly, but I soon discovered that in my hast I had not considered a lot of layout issues that would only become apparent in the board layout.
published by MRE on Sun, 08/18/2013 - 05:35
Today's task is to start planning out the project, how it should function and to get a rough idea of what the hardware will look like.
This will be a long blog (wall of text alert) so settle in with a drink and some tunes and take your time with it. I am sorry to say that I have not prepared any images to accompany this one, but may add some in later.
published by MRE on Sat, 08/17/2013 - 02:38
The purpose of this blog is to illustrate how to go about bringing up a project step by step.
In this step of the THS Membership Box, we wire up the bill acceptor to the Arduino and start some very simple Arduino code.
The bill acceptor output is a pulse, which starts high, then drops to a logic low for a short period of time before returning to high. I have already set the bill acceptor and tested it to output 1 pulse per 1000 yen. Thus, a 1000 yen bill outputs 1 pulse, a 5000 yen bill outputs 5 pulses and a 10000 yen bill outputs 10 pulses.
Pages