Solar X-rays:
![]()
Geomagnetic Field:
![]()
From n3kl.org


You may have followed my last blog post about how not to layout a pcb.
Well, I got around to finishing up the board. Fixing all my mistakes only took about an hour, and as soon as I did so, the board routing was incredibly fast. As you can see, its much more efficient and clean.
Now, I admit to using a bit of auto routing. This is a one time only board, and even with prototyping services (I'll be using Seeed Fusion), I still need to order 5. Which means I will have 4 left over. Needless to say, I don't really care about some of the wacky stuff auto routing does. If it were me, there would be less square corners, and none of them diving towards other traces. But this is well within the Seeed guidelines, and I dont feel the need to spend the few hours necessary to clean up the autoroutes.
The board is ordered, and should arrive in a few weeks.
In the meantime, I can mount some buttons, LEDs, and the LCD to the box.
I also have a load of coding to do, but I was hoping to get the hardware to the hackerspace. I plan on doing all the code myself, but if someone else wants to jump in, I aint gonna stop them ;) I think it makes a great Arduino class project. I should be restarting those in the next few weeks as well.
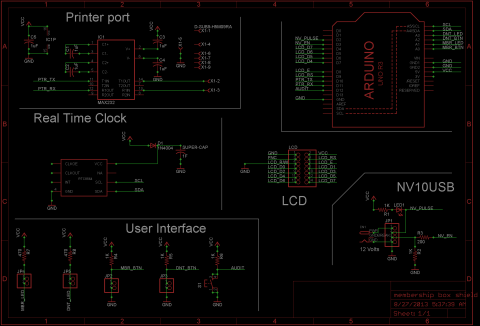
Here is the new schematic:
Theme by Danetsoft and Danang Probo Sayekti inspired by Maksimer
Comments
Tiny Gremlins
The first spin of a board is always the hardest.
I found all sorts of tiny mistakes in routing, nets, and a few that I made myself.
I made all the repairs to get one board up, and have 4 more in need of fixes. I also completely revamped the files with the corrections, as well as routing the board myself (auto route really IS junk).
If I run the board again, it will be via OSHpark, as for small quantities, its just so much cheaper than Seeed.