Solar X-rays:
![]()
Geomagnetic Field:
![]()
From n3kl.org


The purpose of this blog is to illustrate how to go about bringing up a project step by step.
In this step of the THS Membership Box, we wire up the bill acceptor to the Arduino and start some very simple Arduino code.
The bill acceptor output is a pulse, which starts high, then drops to a logic low for a short period of time before returning to high. I have already set the bill acceptor and tested it to output 1 pulse per 1000 yen. Thus, a 1000 yen bill outputs 1 pulse, a 5000 yen bill outputs 5 pulses and a 10000 yen bill outputs 10 pulses.
It should become clear that the most affective input on the Arduino would be an interrupt input pin. Because I would like to keep the serial port for debugging, I chose to use pin 2, which is interrupt 0.
You can refer to the utterly ugly Fritzing graphic above, or the below schematic. Check out that tiny box for the NV10. Wow I need to get a grip on my sense of scale in Fritzing.
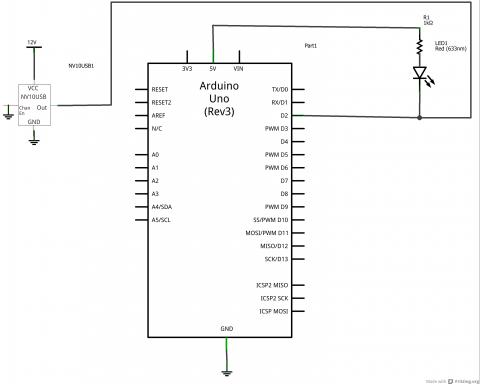
So anyway, here we have the Channel Enable tied to ground, so that the BA is always enabled (pulling this high will disable accepting bills. At some point, we will tie this to an Arduino pin to cut off acceptance while processing payments). It is perhaps hard to notice here, but the 12 volt psu for the bill acceptor has it's ground tied to the Arduino ground. This is important, since the open collector output of the BA needs to pull the Arduino interrupt pin to logic ground. I also threw in an LED to give us an indicator of whats going on. Note that even if you pull out the LED, we still need a resistor in there.
The code should count pulses and multiply this value by 1000, before reporting over the serial port the amount of yen inserted. It should also allow for adding multiple bills together.
This first example will be simple. It is just to demonstrate that we know how to read the bill acceptor and give us a chance to work out any bugs in the interface before moving on to higher level actions.
As with most Arduino sketches, we first define a few variables. Here we have two byte variables. cashCount tracks the interupt pulses, which directly translates to the number of 1000 yen bills inserted (a 5000 yen bill is the same as 5 x 1000 yen bills). bored simply tracks the current value, BEFORE any new bills are inserted. Essentially, it acts as a short term memory. If the two variables are equal, then nothing new has been inserted.
In the setup function, we enable the serial port for debugging, as well as attaching the interrupt to read the bill acceptor output. We need to watch interrupt 0, which is on pin 2. We will look for the pulse falling to zero, and on such events, call the caChing function ;)
During debugging I found that when powering everything up, an initial error of 1000 yen gets added (the Arduino counts a pulse), when in fact, no bills were inserted. To remedy this, I inserted a one time delay of 3 seconds, and reset the cashCount variable before moving out of the setup function and into the main loop. This cures any problems caused by the Arduino resetting. However, we still need to devise a strategy to handle a reset of the BA (much more likely, when you consider the power arrangements I have planned, which will be covered in a future blog). For the moment, this works for initial testing, so lets just keep it simple.
The interrupt service routine is very simple. In fact, it only adds one to the cashCount and then gets out. You really want to keep your ISRs as short as possible. Whenever possible, one line of code should be all that is necessary. Even if that only calls some other code. The reason being, while in the ISR, the hardware can not respond to yet another interrupt. This is true of delays as well. If your project uses an interrupt, NEVER use delays unless you are aware of the fact that any interrupts occuring wont be serviced during the delay. It is ok during the setup function in my code below, because I am SPECIFICALLY choosing to ignore the interrupt pin for 3 seconds, while the BA boots up.
Finally we get to our main loop code. First we set the bored variable to equal the cashCount variable. Thus beginning our comparison. Next I just to an if check on the cashCount value. If it is zero, then report that there is no money 'in the bank'. Finally jump to the hanginAround function. If the value is more than zero, report that we have x times 1000 yen in the bank, then jump to hanginAround.
hanginAround does exactly that. It is a loop within the main loop. The goal here is to sit around doing nothing, UNLESS the interrupt pin increments the cashCount value via the caChing function. Remember that the interrupt can break in any time, but that when it is finished with its ISR (caChing), it will return to the code in the same spot it left off. So, hanginAround just does a simple check to see if bored and cashCount are NOT equal. if it returns true, then there must have been a new bill inserted, so exit out of hanginAround and go back to the mainline, which will re-equal the variables and print a new cash report to the user. If the two values ARE equal, then simply loop through hanginAround until something happens.
With this code structure, the Arduino is mostly sitting idle waiting on the interrupt. It will be easy enough to add future project goals, such as responding to button presses for how to spend the money inserted (which also reduces the cashCount value by how much was spent), calling routines to print receipts, and momentarily disable the bill acceptor (there is a wire from the BA to do so).
volatile byte cashCount = 0;
volatile byte bored = 0;

void setup()
{
  // put your setup code here, to run once:
  Serial.begin(1200);
  attachInterrupt(0, caChing, FALLING);
  delay(3000);          // Wait for the BA to boot
  cashCount = 0;        // clear any interrupts triggered by the BA booting
}

void caChing()
{
  cashCount++;    // for every bill pulse, add 1
}

void loop()
{
  // put your main code here, to run repeatedly:
  bored = cashCount;
 if (cashCount == 0){
   Serial.println("You have NO yen!");
   hanginAround();
 } else {
   Serial.print("You have ");
   Serial.print(cashCount*1000);
   Serial.println(" yen.");
 }
 hanginAround();
}

void hanginAround(){
  if (bored != cashCount){
    return;
  } else{
    hanginAround();
  }
}
Theme by Danetsoft and Danang Probo Sayekti inspired by Maksimer
Comments
It was pointed out to me that
It was pointed out to me that this code might set up a potential crash in the arduino due to loop nesting.
I had not really considered it, but it is a potential problem. This code was just to do some basic demonstration of you might build something useful with the validator.
The final code for the project is quite different (although the ISR is essentially the same). Use this at your own risk.