Solar X-rays:
![]()
Geomagnetic Field:
![]()
From n3kl.org


Ever since writing my first book (Arduino Projects to Save the World), I have been interested in building a weather station. After looking around on the net, I have found a lot of options to buy off the shelf parts and assemble one. Unfortunately, in every case, the systems available were, in my opinion, incomplete. By this I mean that they only recorded a few of the parameters a complete weather station might need. Some recorded only temperature and humidity. Some added barametric pressure. Other systems only recorded wind data. Rain was often an expensive add on kit.
To make matters worse, many (all?) of these systems were propriatary. Open communications protocols were either undocumented or only discovered and published by hackers after the fact. I wanted a truly open source system. To be fair, several of the wind systems offered a simple 'open' protocol for their sensor masts, and allow you to purchase only the mast, without the display unit.
So, yes, in theory you could purchase these individual systems, and then somehow merge the data from all of them into one display. In fact, I would still consider doing that, and might encourage you to do so. However, I ultimately chose to build everything from scratch. I will detail my reasoning in a moment. First, a list of parameters I wish to record, and a very general overview of my ideal system:
I wanted to build a system that was easily expandable, based on the Wiring/Arduino framework, with easy to source materials in most countries, and as simple as possible to construct. I expressly chose NOT to use off the shelf gauges for a number of reasons:
In my build, low cost is not the primary factor, but once I had worked out the kinks I was able to stop wasting money. The current design is pretty low cost, but does require some custom parts, which I will make available as a kit, and is totally open source (as in you are free to make your own parts). This is limited to a few circuit boards and some laser cut acrylic.
The system will consist of a sensor mast which supports one or more sensors as listed above. Within the sensor mast will reside a microcontroller which will read data from the sensor package and transmit it over a serial cable. This data will be received on the other end of the cable by a more powerful computer, where it will be logged. This computer will also serve as data historian, decimator, and web server. It will likely be built on nimbits, rather than cosm.
The system hardware is based around metric sized PVC-U plumbing pipe. This PVC pipe is UV stabilized. You will recognize it as the gray plastic piping that may be attached to buildings and rooftops. Since it is UV stabilized, it will not deteriorate in direct sunlight for at least a few decades. It handles a wide temperature range very well without softening or cracking.
As an outdoor rated plumbing material, water proofing it will be a simple matter. The pipe will serve as a framework, housing of electrical parts and a mechanical structure.
I chose metric since it is available in nearly every country (even in the USA, if you find a good plumbing shop). Most of the parts are made up of size 40 (40mm or 4cm) pipe, T fittings and end caps. Be sure to find FLAT end caps, rather than the rounded dome caps. The build also requires 2 x 50mm caps for the wind sensors.
In addition to the pipe, we will also be using some stainless steel screws and nuts. The remainder of the mechanical parts include 3mm shafts and bearings, as well as some laser cut acrylic.
Thus far, I have build the top of the mast, and tackled the most difficult mechanical aspects of the project. Namely, I have constructed the wind speed and direction spindles, and associated electronic sensors necessary to collect that data. Each has been tested individually.
This project has actually been in progress for some time before I finally started posting about it here. I started and stopped, then started again. This is the second version of the spindle mechanics.
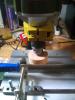
The first version included wooden 'wheels' to serve as bearing seats. To cut them, I started with rough rounded pieces from a hardware store. I then mounted them on a small tabletop mill and mounted a large rasp or file on the X-Y table, such that I could 'dial' it into the spinning wood. This process worked fine, but I quickly realized that without treatment, the wood would not last. Humidity would cause long term issues with wooden parts.
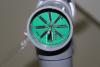
My other failure concerned how to attach the top cap, which holds the wind vane or anemometer cups to the rotating shaft. I tried gluing gears with 3mm shaft holes to the inside center of the 50mm cap. This was a total failure. First, it was difficult to assure the gear was perfectly centered. Then I found that the glue was uneven. It was hard to assure the inside of the cap was flat without milling, and the glue often added more inconsistancy. Finally, I had to drill an access hole on the side of the cap to allow an allen key to tighten the locking screw onto the shaft. This access hole would allow water under the cap, where it might affect the shaft, or worse, enter the spindle body where the electronics were.
Since the whole point of the over sized cap was to allow for an overhang, which would prevent rain entering the body, the access hole would have to be plugged before going into service.
All of these troubles compunded, and the spindle was horribly unballanced. This would cause unacceptably bad performance from the mechanical sensors. Thus, I switched to laser cut acrylic parts. Accuracy was high, and easily repeatable. Changing cut parameters to fit differently sized parts is easy for you to accomplish. I wanted to avoid the use of high tech tools which may not be available in many places, but the parts are small and cheap enough to be shipped in an envelope to any reliable address on the planet for less than $15.
 |
Weather Station: The early years! | A few years back, I started on this weather station project while at the Tokyo HackerSpace (in our FIRST location). I had grand ideas for the project, but also knew I would likely... |
 |
A very unusual PCB |
The PCB above is mounted inside of a 40mm T PVC pipe fitting. It is part of my weather station project, and gave me some interesting challenges to overcome in EagleCAD. The... |
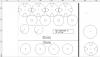 |
Weather Station Acrylic | For flat materials, I have long been using CorelDraw. I began with it back in 1994, and have been loving it ever since. Recently I have been trying to use Inkscape more and more.... |
 |
FreeCAD PVC pipe assembly | I dug out my FreeCAD drawings and made images of the drawing. I am adding those images now, and will link the mechanical file. You can open it in FreeCAD, explore the mechanical... |
Theme by Danetsoft and Danang Probo Sayekti inspired by Maksimer