Solar X-rays:
![]()
Geomagnetic Field:
![]()
From n3kl.org


The Ardunio development environment (Wiring) has changed the way we do things in the microcontroller world. It is no longer necessary to deal with make files, configuration tools and so many lines of code just to set up the serial port so you can print "hello world." By obfuscating all the hard bits that go into just bringing up a micro to a working state so you can write some code in the main.c file, the Arduino made entering the world of microcontrollers so much easier for artists, hobbiests and young engineers.
Unfortunately, the Arduino IDE only supported the ATMEL family of microcontrollers in the past. However, the nature of how the compiler through to the IDE is constructed meant that it would be easilly portable to any micro supported by a mature implementation of the GCC open source community C/C++ compiler tool set.
Essentially, the abstraction layer sites between the GCC compiler and the Interactive Development Environment and translates the additional Wiring keywords into appropriate code to pass to the C compiler. For example, this layer converts the pinmode Arduino command into the relevent lines of code necessary to configure pins on your particular micro. To support micros other than the Atmel family, someone with enough knowledge and a bit of skill need only point these Arduino keywords to the rewritten code that does the equivilant job on the new micro in GCC. It was only a matter of time before Arduino implentations for other micros started to pop up.
As far as I know, there are two mature releases of the Arduino development environment for new chips. These implentations are independantly developed and maintained, and are not officially part of the Arduino company. The first is for the Texas Instruments MSP430 series of chips. Most notably the Launchpad kit, but also supporting the eZ430 kit. I will be covering that implementation here, and in a future article will discuss the Maple implementation for ST ARM cortex devices.
Texas Instruments MSP430 series
The TI MSP430 is in the same class as the Atmel and Microchip PIC line. They all have similar peripherals and pin counts. However, the MSP430 series is a 16-bit CPU, with low power modes better suited to battery powered devices than the typical PIC or AVR/ATMega. Typical chips include between 8 and 16kB of FLASH, 256-512 bytes of ram, and capacitive sense inputs (which the competitors lack). Other featues include 16-bit timers, 8 channel 10-bit ADC, and the usual communication options. Frequency ranges between 1 and 80Mhz (StellarPad), but 16 is typical.
The Launchpad hardware
By far, the biggest advantage for students and hobbiests is the fact that TI supports the learning community via incredibly low priced demo boards. The Launchpad kit can be ordered online from TI for as little as $4.50. Yes. Less than 5 bucks. I purchased two kits in a shop in Tokyo for 570 yen. This board is a similar form factor to the Arduino, but does not continue with those pesky misaligned pins.
The other option for low cost development is the eZ430 line of USB stick development kits. This include a main board downloader tucked inside a USB stick case. Attached to the downloader is a tiny cpu carrier board which contains the MSP430 chip. This can be permanantly mounted in a project, and each carrier board only costs about 5-6 dollars. The cpu selection in the eZ430 USB stick line are particularly suited to low power applications, wireless and tiny spaces. At 2880 yen (starting at about $20 direct from TI) it is still much cheaper than an official Arduino, but more than the typical Arduino clone.
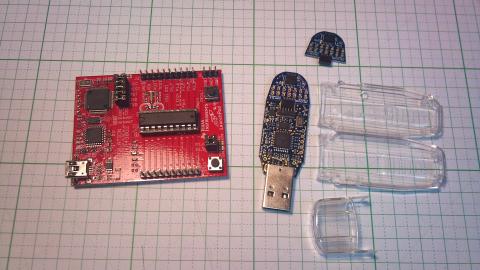
The TI Launchpad on the left, with eZ430 USB stick in the middle. Above the stick is a spare CPU board. On the right are the plastic parts that make up the USB stick case.
Launchpad gets Arduino-ed with Energia
Fitting with the space theme of the TI Lauchpad, the independantly developed Arduino implementation for MSP430 is codenamed Energia, after the powerful Russian rocket boster. You can find all the details at Energia.nu
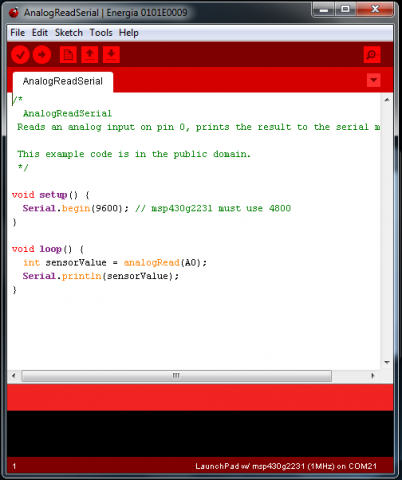
The Energia IDE window. Red makes sense. But I'm not a fan of red on red, in red, with a bit more red. It is better than the sickly green of Maple.
Be sure to read through the Getting Started section carefully, as you will need to be sure you install the appropriate drivers. Energia assumes you have a Launchpad (or it's must faster companion, StellarPad), and makes no mention of the eZ430 hardware. After an email with developer, I learned it is not officially supported. (A solution is mentioned later in this blog).
You should also take the time to check out the hardware documentation carefully. By default, some jumpers are installed at TI in one configuration, but depending on the hardware version you have, you will need to rotate two jumpers 90 degrees in order to enable serial terminal functions.
After installing the drivers, you will next want to install the Energia environment. Now, I initially felt I had a working installation, but upon attempting to compile a simple test program, I got a show stopping error, reporting it could not find a file I could easilly browse to. It turns out that the Arduino IDE has a problem with too many spaces in path names. So, lesson learned: Install to Program Files or in a folder right in the root drive, NOT Program Files (x86). After talking with the developer, I learned this issue has been found and resolved. It will be fixed in the next stable release.
Playtesting the Launchpad
With the folder names problem fixed, I found that several of the demo programs compiles and uploaded without issue. You have all the usual demo sketches that come with the original Arduino IDE. You also have the usual steps to walk through, such as selecting the correct board and clock frequency, as well as the correct com port.
One issue I had reared its rather ugly head when I tried out the analog serial sketch. Just a quick review: It reads a potentiometer on an analog pin and then reports the value to the terminal over USB serial. There is some weird issue with the way the Emulation/Programmer side of the Launchpad board. After uploading the sketch to the chip, the serial port goes silent. I poked around and found Xin and Xout pins on one of the headers. I connected my FTDI adaptor, and still no luck.
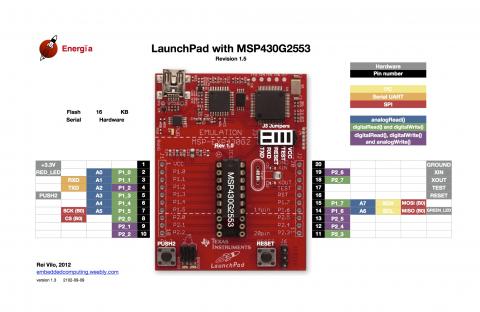
Launchpad rev 1.5 hardware pin outs and jumper configurations, courtesy Energia. To view the complete hardware guide, click here.
The Two halves of the board are connected via a group of jumpers. Eventually I removed the TXD and RXD jumpers and connected my FTDI board up to the micro's half of the board and presto, I had serial communication. Thinking this was rather inconvienient to have to first connect jumpers and upload my sketch, then disconnect them and attach my own com adaptor to the board, I tried sending the sketch directly over my FTDI adaptor, as I would do with a low cost Arduino clone lacking a usb port. The sketch transfered just fine.
This is when I discovered reading the hardware documentation very carefully helped a tremendous amount. While the Launchpad and a typical Arduino are comparable, they are still very different designs. After reading the documentation again, and talking with the developer, I realized that all I needed to do was turn the two jumpers as illustrated in the above image, and all worked as it should. I could now both upload code AND use the serial terminal.
Playtesting the eZ430
Getting the eZ430 working required a bit of headscratching and forum searching, but after a few hits I quickly found out what needed to be done. My eZ430 comes with an F2013 cpu. But there was no option for this in the board settings. However, it is functionally similar to the Launchpad with a G2231 chip running at 1Mhz installed. Reviewing this forum post confirmed it. So, after selecting that option, "blink" and a few other demo sketches compiled and ran just fine. However, it would appear that due to a lack of uart on the eZ stick, serial terminal functions are not available. I can confirm that I was unable to get serial communcations working through the stick. It may still be possible with a seperate FTDI adaptor.
I will be making my own board entry in the boards file for the eZ devices (I have two different chips). However, I would suggest that the Energia developers move to include these devices. It should not be difficult at all to add them to the next release.
Verdict
All in all, I am very impressed with the Energia project. I am quite glad to see more microcontroller options receiving Arduino implementations. I suspect that in the not to distant future MOST micros will be programmed in an Arduino/Wiring style environment. Arduino on top of GCC has proven to be stable enough to port to other CPUs, and this trend will continue to grow. Even if you are a diehard Arduino fan (or ANTI-Arduino), you should consider giving the TI Launchpad and Energia a try.
Theme by Danetsoft and Danang Probo Sayekti inspired by Maksimer